Build the stay around the gear journey
Adventure guests arrive early, wet, muddy, salty, cold, or carrying expensive equipment. The useful property shows exactly how gear moves from vehicle to secure storage, rinse, drying, repair, and the next departure.
The short answer: Choose the activity first. Map its equipment, weather window, contamination, charging, security, and departure rhythm, then design the property around that sequence. Publish route and conditions information with source and review dates, disclose what the property cannot provide, and photograph the working setup at full load. Durable flow is the theme; decorative maps and borrowed props are not.
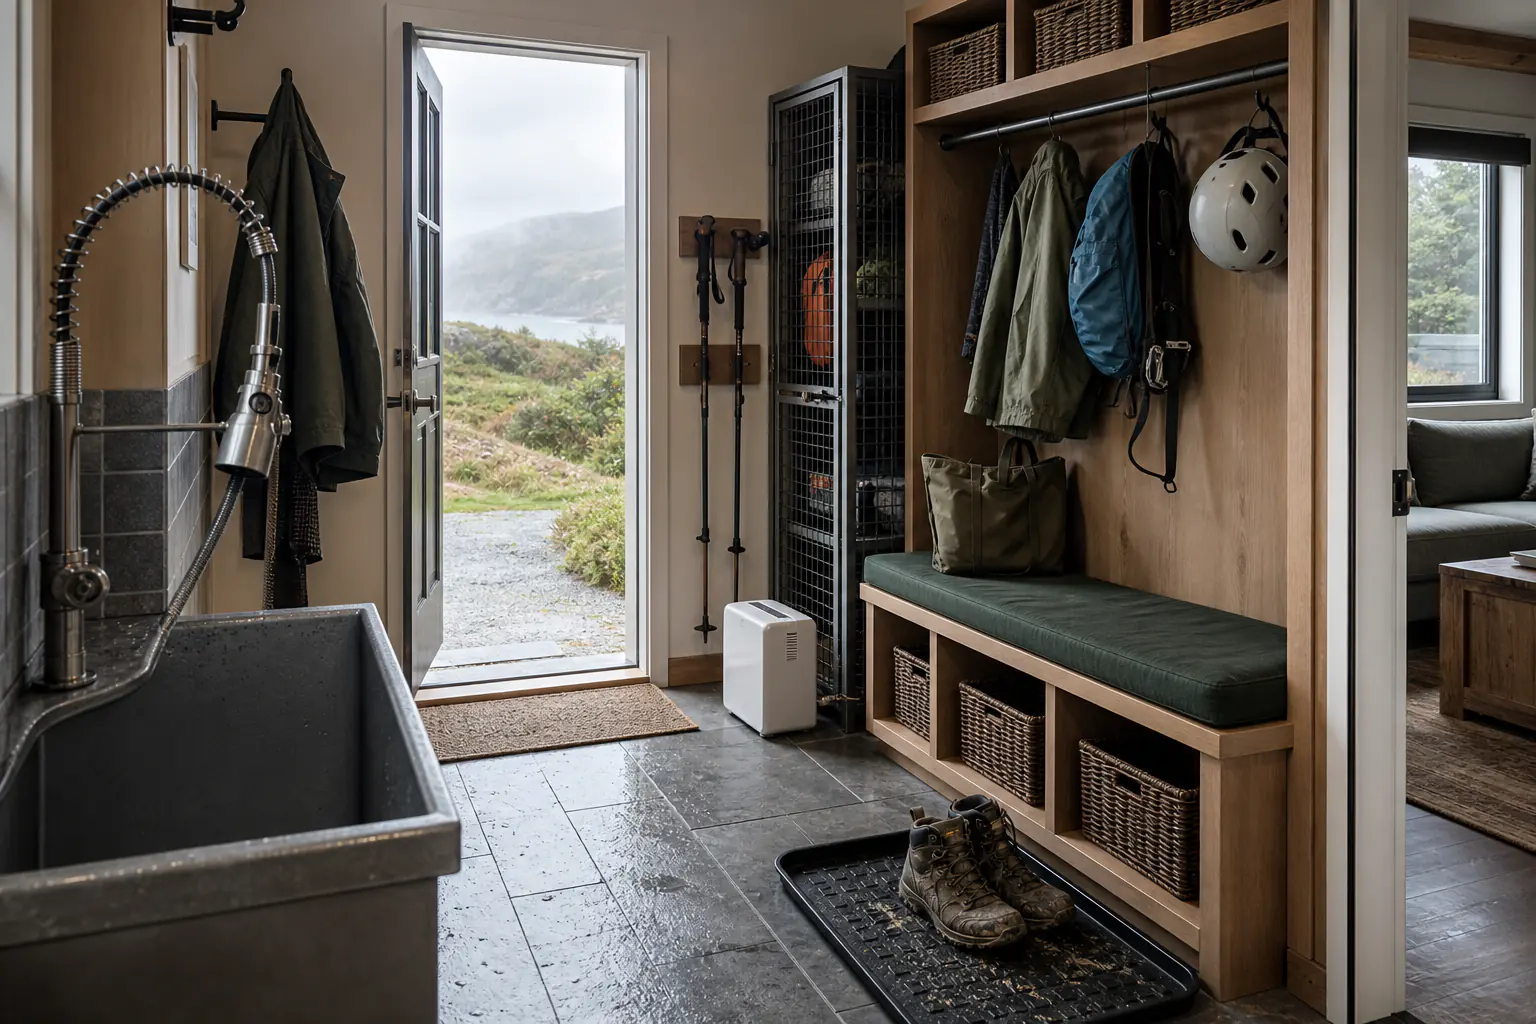
Design from conditions, not scenery
A beautiful location does not make an adventure stay operational. The property earns the label by handling the specific activity on a bad-weather day and by telling the truth about routes, access, storage, and equipment.
-
Trace the dirty-to-dry flow
Map the route from vehicle to drop zone, rinse point, drain, drying rack, secure storage, repair surface, and repack area. Keep wet and abrasive equipment away from bedrooms, soft furniture, and food preparation.
-
Plan for the forecast that changes
Give guests a sheltered arrival, absorbent floor, ventilation, heat-safe drying choices, spare towel capacity, and a clear place to review current conditions. State seasonal closure, snow, tide, heat, smoke, wind, or flood constraints relevant to the location.
-
Tell activity-specific truth
Name the actual trail access, ride surface, ski transport, launch point, board clearance, tank restrictions, or night-sky conditions. Distinguish what is on site from nearby services and never stage equipment that guests cannot use.
-
Make hard-use features serviceable
Choose replaceable mats, corrosion-resistant hooks, washable walls, protected corners, repairable racks, outdoor-rated fittings, and drains that can be cleared. Every hero feature needs an inspection and replacement route.
-
Provide orientation, not assurance
Curate official forecasts, land-manager notices, tide or avalanche services, emergency contacts, transport options, and local shops with a review date. Guests still choose routes for their ability, equipment, and live conditions.
A strong fit when
- The property has a direct, durable route from arrival to a gear drop without crossing the primary living area.
- Wet equipment can be rinsed or contained, drained, ventilated, and dried without relying on bedroom radiators.
- Bikes, boards, skis, packs, or water equipment can be stored at realistic capacity and with clearly described security.
- The host can maintain dated local information and distinguish official condition sources from personal route suggestions.
- Floors, walls, laundry, water use, and turnover time can absorb the actual mud, salt, sand, wax, and grit of the named activity.
A weak fit when
- Guests must carry dripping or abrasive gear through carpeted bedrooms or around fragile furniture.
- The only drying method is an unventilated cupboard, open fire, portable heater, or improvised rack in the sleeping space.
- The listing uses trail, ski-in, waterfront, or secure-storage language that the arrival route and photos cannot substantiate.
- Route cards are undated, unofficial, or presented as suitable for everyone regardless of conditions and experience.
- Supplied specialist equipment has no inspection, sizing, hygiene, maintenance, or retirement process.
Start with one activity the building can genuinely support. A strong cyclist stay and a strong dive stay need different clearances, wash systems, storage, and information; “all adventures welcome” usually hides those distinctions.
Price the full wet-weather workflow
These are planning allowances for durable materials, equipment, fixtures, and typical installation; drainage, electrical work, structural changes, local labor, and taxes vary. Include maintenance, water, filters, laundry, and replacement parts in the operating review.
Organize the base
$500-$2,000Create a sheltered drop with boot trays, washable mats, corrosion-resistant hooks, labeled tubs, a basic repair kit, towel allocation, current route board, charging rules, and honest storage photography.
Complete rinse and dry
$3,500-$12,000Add secure racks, a repair stand or wax bench, hose and draining rinse point, fan-assisted ventilated drying, durable wall protection, utility sink where suitable, improved lighting, and enough laundry capacity for peak occupancy.
Build the gear room
$18,000-$75,000+Construct or convert a mudroom, board store, bike workshop, ski room, or external gear building with deliberate drainage, ventilation, heating strategy, electrical layout, security, clean and dirty zones, and service access.
Move equipment without moving the mess indoors
Arrival and dirty drop
Contain water, grit, and equipment at the first threshold.
- Provide a sheltered unloading point with night lighting and publish the carry distance, steps, door width, and obstacles from parking or transport stop.
- Use grippy washable flooring, deep boot trays, wall protection, and enough hooks and bins for the advertised group at full gear load.
- Mark separate positions for wet clothing, helmets, packs, footwear, and clean luggage so guests do not build their own system in the living room.
Rinse and contamination control
Remove salt, sand, mud, or snow before storage.
- Match the rinse point to the activity: low-pressure hose and rack for bikes, board and wetsuit clearance for surf, or a controlled exterior snow and boot zone.
- Direct runoff to an appropriate drain or contained surface, keep it away from entrances and neighboring property, and provide a simple method for clearing grit.
- Label what may be rinsed, which products are prohibited, and where oily parts, wax residue, batteries, or specialist equipment must be handled instead.
Drying and ventilation
Dry layers completely without unsafe heat or trapped moisture.
- Space rails and mesh shelves for airflow around gloves, boots, wetsuits, shells, and hydration gear rather than stacking items in closed bins.
- Use fixed ventilation and suitable controlled heat, provide a hygrometer or timer where useful, and state what must never be placed on heaters.
- Separate guest drying from spare linens and cleaner supplies, then test the room at maximum stated capacity after a wet day.
Secure storage and repair
Protect valuable gear and make routine fixes possible.
- Show rack capacity and dimensions with real scale, describe doors, locks, shared access, visibility, and whether equipment is stored inside or outside the main building.
- Give the named activity a stable, well-lit work surface with only the maintained tools the host is prepared to inspect and replace.
- For e-bike batteries, allow only compatible manufacturer-approved chargers and refuse damaged, swollen, hot, wet, or recalled batteries. Use an electrically assessed location away from exits and combustibles, with appropriate detection, a written stop-and-response procedure, and insurer and local fire-service guidance reflected in the house rules.
Route desk and next departure
Help guests make a current plan and leave efficiently.
- Group official forecasts, land or water notices, emergency contacts, transport, repair shops, and access rules on one dated board with dependable mobile links or printed references.
- Offer a large, wipeable route surface with distance, ascent, surface, daylight, tide, seasonal closure, and bailout notes only where the host can keep them current.
- Place water filling, breakfast basics, keys, headlamps, and final gear checks along the exit route without waking bedrooms or crossing the wet zone again.
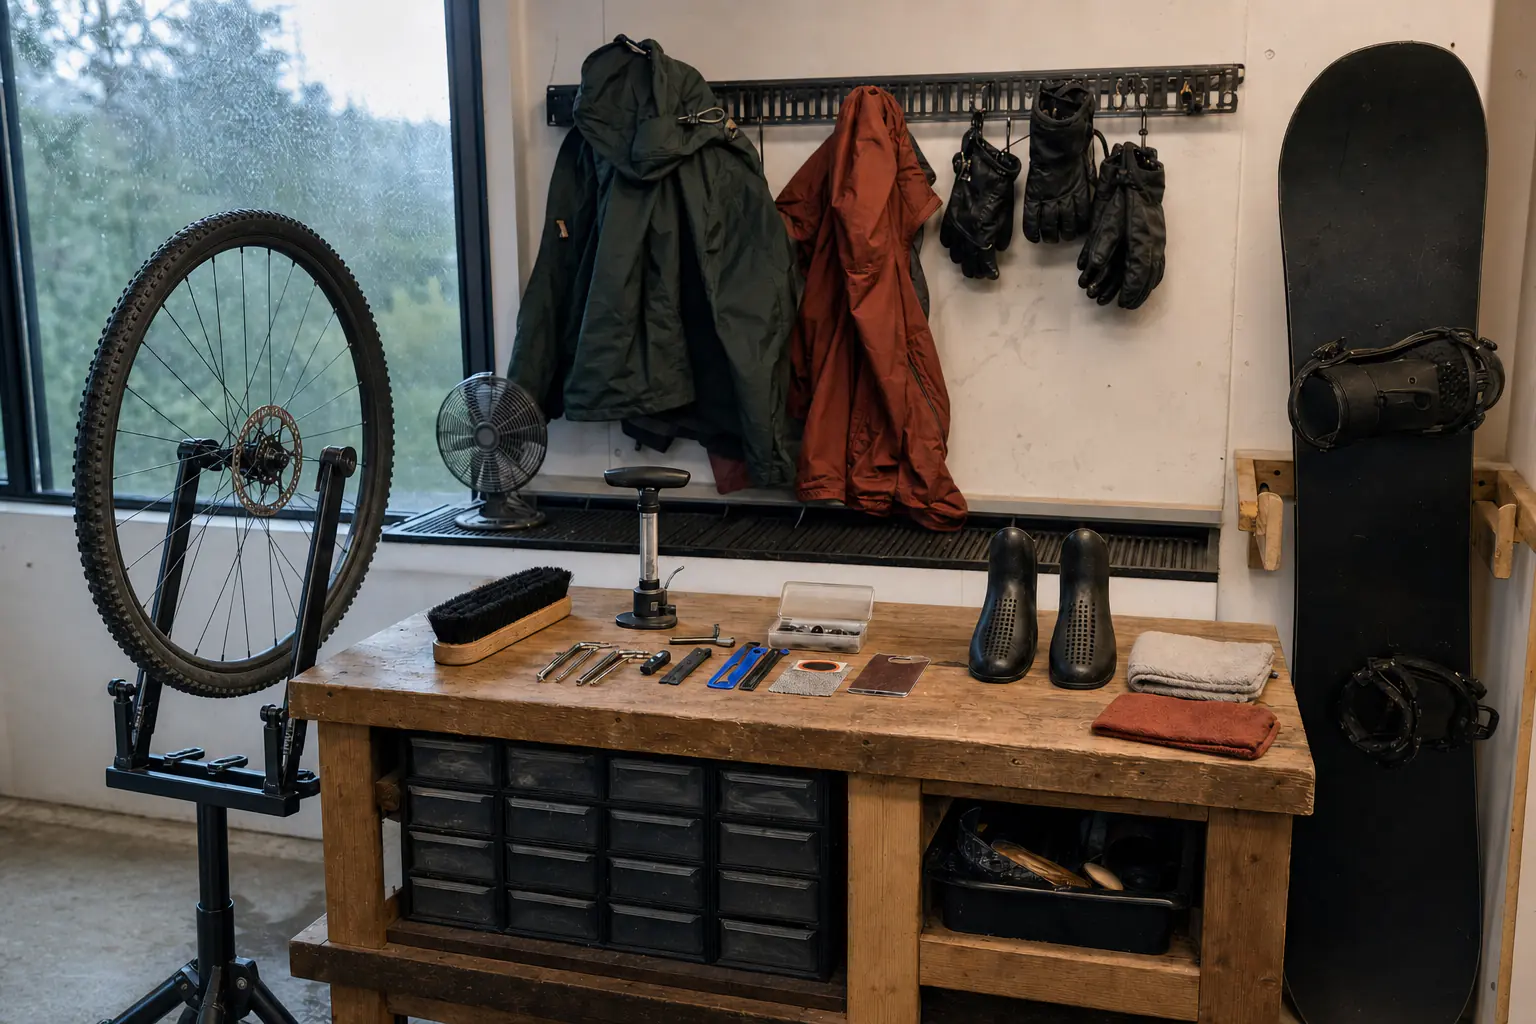
Three basecamps with different proof
Choose the version that matches local access and the property's physical workflow. Each one has a different definition of clean, secure, dry, and ready for tomorrow.
The ride and trail base
Promise: Riders and runners can arrive dirty, secure equipment, make ordinary repairs, and depart early with a current route plan.
Proof: Measured bike or pack storage, floor pump and maintained tools, washable work area, shoe and hydration drying, water fill, surface-specific routes, ascent notes, and nearby repair options.
Avoid: One decorative bike hook, road-only route advice in a mountain-bike area, unverified GPX files, or “secure” storage that is visible and shared but not described.
The water and coast base
Promise: Boards, suits, and water gear can be unloaded, rinsed, drained, dried, and stored without carrying salt and sand through the house.
Proof: Board-length clearance, shaded rinse point, suit rails with airflow, drainage, corrosion-resistant fittings, tide and launch sources, weather alternatives, and clear limits on tanks or specialist equipment.
Avoid: Wetsuits on bedroom radiators, boards staged only for photographs, stale tide information, or a rinse hose whose runoff crosses the entrance.
The snow and mountain base
Promise: Guests can manage boots, layers, skis or boards, changing access, and an early mountain departure in winter conditions.
Proof: Covered snow-shedding entry, boot and glove drying, ski or board rack, wax-safe work surface if offered, road and transport sources, closure updates, grit control, and blackout for early sleep.
Avoid: Calling a property ski-in without showing the route, drying technical gear against uncontrolled heat, or publishing one mountain itinerary as safe in every season.
Maintain the basecamp between weather systems
Turnover checklist
- Clear drains, traps, trays, filters, and exterior grates; remove grit, wax, mud, salt, leaves, and standing water before cleaning the dry side of the property.
- Test extraction, fans, timers, controlled heat, dehumidification, and room humidity; inspect for condensation, corrosion, odor, leaks, and equipment that remained wet.
- Check every rack, anchor, lock, cable point, work stand, hose, nozzle, hook, bench, and supplied tool; record faults and remove unsafe or incomplete items from use.
- Launder gear towels and mats on their defined cycle, separate them from bed and bath linens as the laundry system requires, and restock by the advertised group capacity.
- Review weather, route, transport, closure, emergency, and shop information on schedule; display a visible review date and replace any material whose source or status is uncertain.
Photography that proves the workflow
- 1Open with the full gear journey or its strongest section, using real equipment at stated capacity so guests can judge clearance, rack spacing, and circulation.
- 2Show the route from parking to drop, including shelter, steps, doors, surfaces, night lighting, and the distance equipment must be carried.
- 3Photograph rinse, drain, ventilation, drying rails, and clean storage in connected frames; isolated hooks do not explain whether wet gear can actually dry.
- 4Show lockable storage from outside and inside, then describe access and security factually without suggesting equipment can never be lost or damaged.
- 5Include the live route board, water fill, repair surface, towel allocation, and one honest bad-weather image rather than relying only on scenic activity photography.
Name the activity + state access to the starting point + trace drop, rinse, dry, storage, and repair + identify current information sources + disclose the main seasonal or equipment limitation.
Cycling base 1.8 km by paved road from the east trailhead. Six bikes fit in the locked internal store; the entrance has one 14 cm step and a 78 cm door. Outside, a hose and grated wash pad lead to a ventilated drying room with shoe racks and gear towels. Our route board is reviewed weekly in season against land-manager notices; guests choose routes for current conditions and ability.
Where the adventure promise breaks
Starting with themed decor
Solve unloading, dirt, water, drying, storage, repair, and departure before buying maps, signs, or display equipment.
Using generic gear storage
Count the bikes, boards, skis, tanks, packs, or boots the stated occupancy brings and design around their real dimensions and handling needs.
Ignoring the drain and the air
A rinse point without runoff control and a drying room without ventilation move moisture and contamination rather than managing them.
Publishing timeless route advice
Conditions, closures, transport, and access change. Use authoritative sources, review dates, and factual route characteristics instead of blanket recommendations.
Supplying specialist kit casually
Every tool or item offered needs a defined use, inspection, cleaning, maintenance, storage, and removal threshold. Omit equipment the operation cannot support.
Test the basecamp on the worst ordinary day
Build the guide around the busiest realistic group and wet or dirty conditions. The test is whether equipment, people, information, and cleaners can all move through the property without improvising.
- Step 1: Choose one activity
Inventory typical group size, equipment dimensions, dirt or salt load, weather exposure, power needs, security expectations, start time, and authoritative local information sources.
- Step 2: Map every movement
Walk the route from vehicle to drop, rinse, drain, drying, storage, repair, route planning, sleep, and departure. Mark collisions with clean luggage, living space, food, and cleaner access.
- Step 3: Build and load-test
Install durable controls, load the system to stated capacity, run the rinse and drying cycle after bad weather, test locks and ventilation, and complete an actual turnover.
- Step 4: Photograph and maintain
Shoot the connected workflow, publish precise access and limitation copy, date route material, and add drainage, ventilation, security, tools, and replacement parts to the operating calendar.
Outdoor & Adventure FAQ
What is the first upgrade for an adventure rental?
Create a durable drop zone between arrival and the living space. Add shelter where possible, washable flooring, boot trays, strong hooks, labeled bins, gear towels, and a clear route to rinse or drying. That first threshold prevents damage and reveals what larger system the property needs.
How large should gear storage be?
Size it from the stated guest capacity and the actual activity. Measure handlebars and wheelbases, board or ski lengths, pack depth, boot volume, door openings, and working clearance. Photograph the resulting capacity with representative gear rather than quoting only floor area.
What should a drying room include?
It needs separated wet and dry zones, spaced rails or mesh shelves, drainage or drip containment, fixed ventilation, suitable controlled heat, washable surfaces, lighting, and capacity for the whole group. Test temperature and humidity with a full wet load, not an empty room.
How should hosts share route and safety information?
Lead with current official forecasts, land-manager or water notices, emergency contacts, seasonal access, and transport. Add factual distance, ascent, surface, tide, daylight, and bailout information with a review date. Present it as orientation, leaving route choice to guests based on live conditions and ability.
Should an adventure stay supply specialist equipment?
Only when the host can manage fit or compatibility, inspection, hygiene, maintenance, instructions, secure storage, and timely retirement. Basic maintained workshop items may be practical; personal protective, technical, or life-support equipment often requires a much more demanding operating system.
A credible Outdoor & Adventure stay is a working basecamp for a named activity. It proves how guests arrive, control weather and mess, rinse, dry, secure, repair, plan from current information, and leave again with the building ready for another hard-use day.
Browse all Themes